Friends COS calendar

A subset of the Friends of the Cumbres and Toltec Scenic Railroad located in Colorado Springs, Colorado, with the mission of preservation, restoration, and interpretation of CTSRR historic assets. The Springs group is primarily involved in restoration. See below for blog archive of older postings.

Thursday, June 21, 2018

Spring 2018

We continued with the trim on the inside of the car, installing the tongue and groove panelling.  The "underground crew" also worked on fitting the coupler pockets.

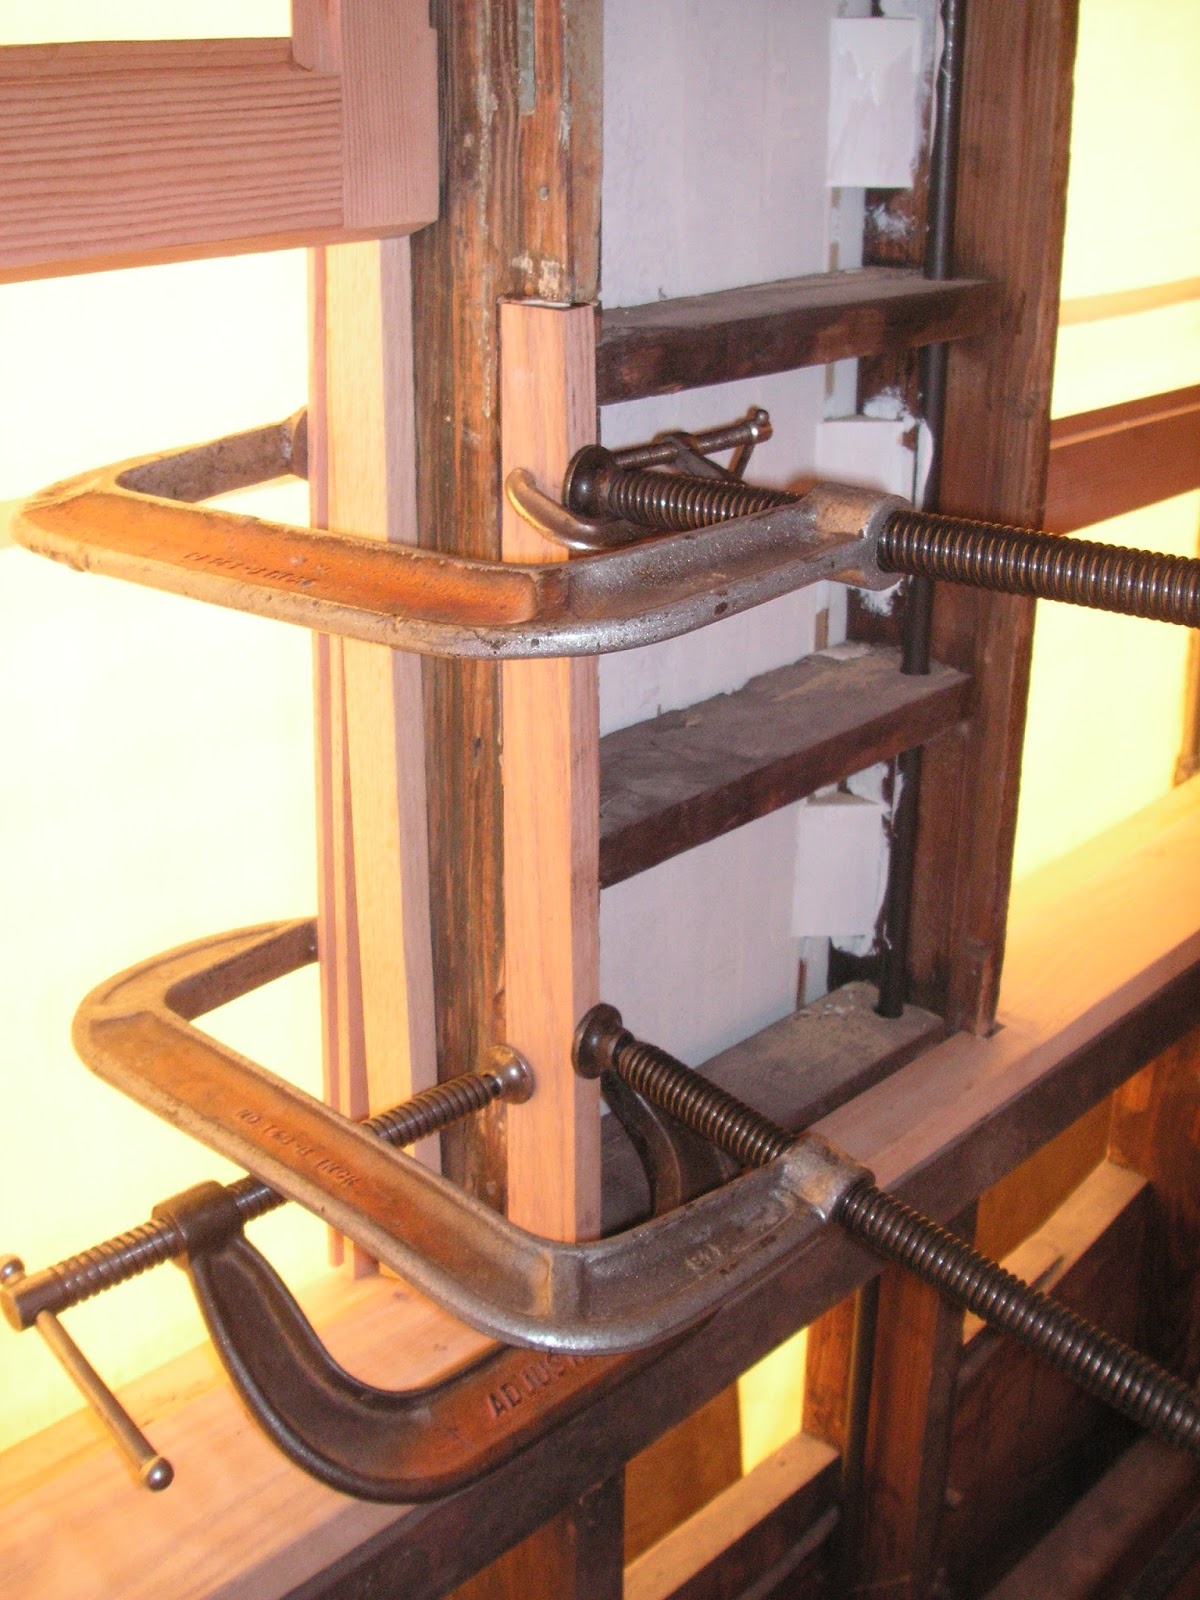
Before the interior panelling can be put up these triangular glue blocks were fastened to the framing and small panels within the the framing which provide stability from shear.


This photo shows placement of the blocks which were both glued and nailed in place.


The interior walls are covered with tongue and groove oak as seen here.  At the right edge of the photo is a piece of the trim that will go above at the junction of the wall and ceiling.


The boards were bevelled where the ends met.

Some of the boards covered hardware and had to be fitted over projecting nuts, etc.  Here Mike is chiseling a pocket in one of the boards.


Furring strips were placed at the ends of the car for the paneling.


One side is done.


Now Don and Mike are putting up the other side, the south I believe.


Ron is back from sunny Arizona  and is putting up the paneling on the end of the car.


This photo taken in mid April looking toward the west end of the car shows the walls are nearly complete.


Here is a close-up view of a corner.


A door was temporarily fitted to its opening to work out how the finishing trim could be done around the door.  The two doors have been in the car recently, and here Craig is removing the stabilizing braces before moving the door.


The door makes it look more finished.


In the last post we saw some of the details of the coupler mechanism.   This photo shows a copy of a drawing made by Glen for one of the steel pieces of the coupler pocket.  Joe fabricated the piece from this drawing.


The orange piece in this photo was made from the above drawing.


Meanwhile, work continued on fitting the steel brackets to the steel on the inner sills of the car.  Bill L. and Bill K. are under the car.  The space is tight, but better than without a pit.  Hard hats are advised.


Some drilling was necessary, and John is adjusting the magnetic drill.


Some of the seat frame castings have been delivered so we had a demonstration on how the seats are set up.


Spacer boards are inserted between the two castings in pockets in the castings.


This photo shows the framing.


The seat and back pieces which are hinged together are inserted in grooves in the castings as shown here.


The back of the seat assembly rides up the grooves and the configuration for passengers sitting is shown here.  The back can be slid down again and the seat moved forward, which together with the facing seat, can make a berth for sleeping.

As of this posting, John Weiss tells us that all of the castings have been completed by the foundry in Texas.


Thanks again to John Engs for help with the photos.

Sunday, March 18, 2018

January-February 2018

With relatively warm winter weather work progressed on the interior trim in 470.  We have added a few new people as well, some fairly talented although they are "over the hill" (belong to the Pikes Peak Over-the-Hill Gang, that is).

Work continued on the interior walls of the car, installing the wood panels between the windows.   In this photo Craig is fastening one of the wide panels between the seat backs where there is a separation of sorts (curtain) between compartments.


In a few areas the framing wood had deteriorated to the point where some replacement with new wood was necessary.  Here Don is fitting a piece into the framing around a window.


Some old wood had to be cut away and the new piece glued in place.


This photo shows a finished panel between the seats with the trim in place.


Here Bill L. is sanding the clerestory after having filled the nail holes and joints between the boards.


Mike is fastening a piece of trim on the narrow space between the windows which is in the center of two seats facing each other.


The photo to the left shows a closeup of one of the narrow panels.  Notice that there are no trim pieces along the edges but decorative milling instead, Craig's handiwork again.


Next the trim boards over the windows were put in place.  The butt joints were beveled so as to be less conspicuous.  Jim K. and Dean are making this one fit.


After that is the crown moulding that Craig made.  He used material that was removed from the car to duplicate the patterns that were original, keeping the original appearance as much as possible.


The last board on this side is partially over a piece of steel so it was glued to the steel as well as nailed to the framing.  Here Jim M. is putting some glue on the butt joint for good measure.


 Jim M. and Jim K. are fastening the board and filling the nail holes.


In this photo Jim K. is putting up the wall boards at the end of the car.


Here I am sanding after filling nail holes in the board just installed.


Screw holes had to be filled on the outside as well, here being done by Bill L.


Joe has been fabricating the material for the platform railings, here modeled by Bill K.  The bend at the lower right is a hand hold for the steps which are just below.


The screw holes in the clerestory decking are being caulked by Don.


Don and Bill K. are making things smooth on top.


The rough spots are caulked on this side.


This is the next layer to go on and the surface underneath needs to be free of sharp edges, etc. that might damage it.


Bill L. started on the paint removal on the overhang on the east end.  First he taped the new wood to keep the paint remover off.


Then came the scraping.  Kudos, Bill, that is a tough job.


John gave a demonstration of the coupler shock absorbing apparatus.  The orange pieces of steel are fastened to the steel brackets on the car that are being installed.  The gray piece in the center houses a large spring which allows slight movement in relation to the supports, so that when cars are coupled together the shock is taken by that spring.


This is drawing of a similar coupling system except that 470 does not have the buffering assembly above.  The red circle is around the coupling mechanism.


Finally, a  picture of one of the patterns for the seat frames made by John Weiss.  These are made of wood and will be used for casting the frames to hold the seats and backs that Craig has made.  This frame is for a single seat that is at the end of the car.


Thank you, John, for help with providing photos.

Wednesday, January 17, 2018

November-December 2017

The end of the year saw work continuing on the finish carpentry, both inside and outside of the car, as well as installing the steel attached to the inner sills for the coupler pockets.  This latter task has to be completed before the flooring can be installed as access to the bolts is needed to fasten the steel angle brackets to the steel on the sills.

In this photo Bill K. is fitting a trim piece that will go on the ceiling at the top of the end cabinet,


This is a view of the corner of the clerestory after the trim piece has been nailed on.


Next the wood trim on the clerestory window pillars was installed.  In this photo Dean is measuring to cut a piece for the wide pillar.


This photo shows one of the wide pillars that is finished. These wider pillars are located where the seat backs come together and allow for a (very) little separation between the compartments.
Next was the moulding that goes below the windows.  For installation it was rotated clockwise 90 degrees so that the flat surface on the bottom was facing the wall.   It is beveled on the top to allow for the windows to open.


In this photo Don is installing a piece of this moulding.


Next were the trim boards that are below the windows.  These fit against the above moulding and under a small lip on the moulding.  Here Mike is holding a board while Bill K. is nailling.


This photo shows the relationship up close.


This is what it looks like when finished.


Craig has finished the seats and backs, and they are safely put away in a storage pod.


Work continued on the outside trim as well.  Here Don is finishing off the the trim pieces on the end of the car.


The ends of the trim pieces have been rounded and tapered.  Looking good.


This photo shows Craig finishing off the lower part of the corner piece with a sander.


There are screws holding the corner piece on and wood plugs filling the screw holes.  Now they have been sanded smooth.


The "underground crew," John and Bill L., continued work on installing the support angle brackets for the coupler pockets.  This involved removing the nuts on the long bolts going through the inner sills.  The brackets were previously marked and drilled and now being bolted in place.  Here John is working from the pit below the car.


This photo shows Bill on the floor of the car keeping a bolt from rotating while John turns the nut below.


One bracket has been installed and John is bringing in another.  As you can imagine they are quite heavy, and working space under the car is restricted.


 They used a beam made from 2x4's to rest the brackets on while lining up the bracket to the bolts.


In this photo John is holding the bracket in place while Bill tightens the nuts.


This photo shows a bracket installed with nuts and lock nuts in place.  There also is a straight edge extending across to the other inner sill on the left to mark the position of the bracket on that side.


Finally we extended the platform on the east end of the car with plywood so as to provide a better surface for a ladder to access to overhang above.  The under side of the overhang needs to have the paint stripped which will happen on a warmer day.  Here Don is securing the plywood to a 2x4 underneath.


In this photo Mike is reminding us where the edge of the platform is.


Followers

Blog Archive