Friends COS calendar

A subset of the Friends of the Cumbres and Toltec Scenic Railroad located in Colorado Springs, Colorado, with the mission of preservation, restoration, and interpretation of CTSRR historic assets. The Springs group is primarily involved in restoration. See below for blog archive of older postings.

Monday, May 7, 2012

Prep. for steel (2) - 4/7/12

Work continued on removing and squaring the ends of the cross pieces.  A speed bump was encountered near the west end of the car where the inside sill had been repaired, and the splice was unstable so accurate measurements for the cross pieces could not be obtained.
 
In these photos, John and Tom are realigning the sill splice and fixing it with bolts and glue.  Just like orthopedics, eh?


Meanwhile, George and I worked on a piece of angle steel that will be bolted to the end sill on the west end of the car.  On the left, George is notching the end of the steel to fit around the corner moulding of the car, just above his right shoulder.  On the right is a closeup of the cuts that were made.  We started to drill holes for the bolts in the steel, but completion will wait for another day with a better drill.
 

Craig has fabricated corner moulding for replacing the unusable ones on the four corners as well as the doorways.  On the left are two posts ready to be installed, and on the right is a corner in need of one.  A couple of them were in good enough shape to keep.

Preparation for steel - 3-17-12

The next several weeks will be devoted to cleaning up the framing and preparing for installing the steel reinforcing so that the car will be trackworthy.

Following elevation of the car, new stairs were built for easy access to the inside.  The photo on the left shows the west end coming from the workshop area, and the one on the right is the east end.

There will be steel angle pieces running the length of the car alongside the inner sill that Tom is straddling.  The framing cross pieces are being removed and cut down slightly to accomodate the thickness of the steel.  Each piece was numbered with a corresponding number placed at its location since the measurements differed slightly at different locations.  The mortises were left at the outer ends, and brackets will be fabricated at the inner ends of the cross pieces to hold them in place.
Meanwhile, Craig has been busy as usual making window framing as shown on the left.  The piece on the back of the bench is the original frame for one of the cabinets at the end of the car over the door.  On the right, John is calculating the steel requirements.  He and Glenn have been spending considerable time working out the details of the dimensions and installation plans.

On a personal note, I must apologize to those who have sent comments with questions.  I just discovered them, and will try to check the comments more frequently and respond as appropriate.

Monday, February 20, 2012

Tie rods and ties - February 18, 2012

This work day was devoted to continuing replacement of the vertical bolts through the sill and plate along the sides of the car, as well as elevating it another tie height.  There was no work session on Feb. 4 because of weather.

Bob and George are working from below to remove the old bolts that pass through the 2x10 plate on edge along the lower side of the car, and down through the outer sill.  They had to be driven up from below, and pulled out as Ray is doing from inside the dar.  As always, Tom is "handy" standing by.  New bolts were passed down through the plate and sill, then snugged up from below.  Tom continued with placing the brackets attaching the framing to the sill as described last time.

John gave the horizontal tie rods one more "tweaking" with a socket wrench to be sure they were all tight.  Then ties were put in place in preparation for jacking up the car another notch.  Ties and blocks were placed at each corner of the car, and each end of the car was raised with jacks on the corners, alternating ends.


Now Tom can stand under the car without hitting his head (Craig, probably not so much).  A third set of ties was also placed in the middle of the car for additional support in this area as shown on the right.

Saturday, February 4, 2012

Tie rods, sill, etc. Jan. 21, 2012

The tent flap was raised and the remaining tie rods inserted throught  floor framing.  Some guidance was required from under the car to direct the rods through the holes.
These photos show the tie rods passing through holes drilled in the brackets used to secure the horizontal framing to the new sill.  These framing members originally were mortised into the sill, but the tenons were cut in order to remove the old portion.  The rods were then fixed with washers and nuts on the outside of the sill.  The brackets are secured with lag screws.


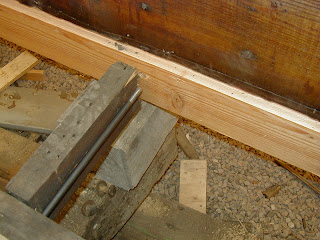
The photo on the left shows the joint between the old and new portions of the sill that has been secured with epoxy and bolted with three bolts.  The ends of the tapers have been squared off  to prevent slippage with compression forces, as with coupling cars together.  On the right Craig is installing the hardware that secures the end of the truss rod that goes the length of the car.  This was cut to remove the sill, and more will be shown about this later.


Finally, the car was raised another tie thickness.  One end was jacked up and blocked, then the other end the same.  On the left above Glenn, John, and John are raising this side, and Bob is on the other on the right above.  Bob was not really working alone as I had been working with him.  Working under the car is getting easier, although one still has to be aware of the crossbars holding the rails as shown on the right under the ties.  Hard hats or cheesehead hats help.
Craig has made an excellent reproduction of the boiler plaque from Locomotive 463 and mounted it on a board with a photo of it as shown.  These may be available to benefit the restoration at some time in the future.

Thursday, January 12, 2012

A New Year - Jan. 7, 2012

Out with the old, in with the new - side sill, that is.  On New Year's eve day several hardy souls removed the east half of the north sill that had rotted from the water from an icebox in this corner.  On the first work day of the new year the new sill was fitted in place.
In the photo on the left is a view of the northeast corner of the car showing the framing that was mortised into the  top of the old sill, and the new piece on chairs next to the car.  The photo on the right is looking in the opposite direction.  The new piece and remaining good section of the original sill will be joined with a taper as shown, then glued with epoxy and bolted together.

In the photo on the left, Bob is cutting the taper into the original sill end.  On the right, it was asked how many Friends it takes to change a sill?  Craig's answer was "As many as we can get."  It took a few tries to get all the mortises and notches to fit snugly, but the process went quite well.
It took some tweaking with saws and chisels to get all the pieces to fit together, but eventuall they did.  Some of the tenons on the vertical framing had to be tapered to raise the new sill in place.  The horizontal tenons were cut during removal of the old sill, and will be replaced with angle iron plates.  In the photo on the right a clamp is holding the old and new pieces together temporarily.

Concurrently with the sill replacement Ray and John were replacing the horizontal tie rods.  The side of the shelter had to be raised to remove the long rods, and things got rather interesting near the end of the process as a cold front went through and blew the fabric out and up.  It shifted to the other side as well, but everthing came back together as we tightened the loose side back down.  At the end of the day the vertical and horizontal tie rods had been passed through the new sill and were securrely tightened.

Thursday, December 29, 2011

Up and Out - December 17, 2011

There was a work session the Saturday after Thanksgiving which I missed, as we were visiting family in North Carolina.  The day was devoted to raising the car in preparation for removing the rotted sill on the north side.  The crew used hydraulic jacks, blocks of wood, and railroad ties to elevate the car three ties higher than it was, allowing for room to work and drop the old sill down from its attachments.
In the photo on the right, above, Craig is cutting a horizontal truss rod that goes through the old sill to be removed.  Bob Kohler, who joined us recently, ponders the situation.  Bob worked in the City yards next door to us, saw activity that interested him, and became involved after retirement.

There were long bolts through the 2x10 framing at the interior base which passed through the bad sill and had to be pulled up out of the sill.  The vertical tie rods were loosened from below and pulled up as well.  The horizontal tie rods were cut as they will be replaced anyway.  We will have to roll up the structure sides and remove them to the south as the roundhouse building is adjacent to the north side.                                                                            

The next step was to screw small pieces of wood into the under side of the sill to act as a shelf for the replacement piece in order to accurately mark the length as well as some of the holes, etc. for fastening.  The new sill can be seen on the floor next to the  north wall.

The last two photos show some work that Craig had done earlier on the moulding below the windows as well as the window frames.  The long piece is now fastened in place.  Spring clips have been made to retain the windows in the open or closed positions.

Monday, December 5, 2011

More oil - November 5, 2011

Painting the framing with linseed oil continued on the first workday in November.  On the left,  Ray (on the ladder), Tom (standing), and George (sitting) were hard at work.  On the right, above, Rich is doing the carlines overhead.  This pretty much completes the oiling except for the underside of the floor framing which will be done after the car is raised.

The other activity happening concurrently with the oiling was installing the vertical truss rods.  These were all replaced as many of the old ones were rusted.  They extend from the top to the bottom sills through the vertical framing as seen in the photo on the left above.  On the right above, the spacing every few feet is evident, as well as the top nuts securely tightened with historically correct square nuts.

Followers

Blog Archive