Friends COS calendar

A subset of the Friends of the Cumbres and Toltec Scenic Railroad located in Colorado Springs, Colorado, with the mission of preservation, restoration, and interpretation of CTSRR historic assets. The Springs group is primarily involved in restoration. See below for blog archive of older postings.

Wednesday, July 29, 2015

June - July 2015

June was an abbreviated month at the COS worksite because of work sessions in Antonito and Chama, as well as vacations.  Efforts continued on the roof decking and truss rod hardware, however.

Bill and Jim are doing the honors on top.  The lower roof is done and they are installing the decking on the clerestory.


Craig is the "cutter," cutting the boards to length and handing them up to the pair on the scaffold.


Meanwhile, John is drilling holes for the bolts for the truss rod bracket on the northwest corner, again defying gravity.  His help disappeared to take this picture.


It is now July 1, an extra work session, and the clerestory decking is finishing up.  In the photo on the left, above, Don and Bob are in the heat in the top of the tent.  On the right there is a small strip to go.

By the next work session in July, John is putting lock nuts on the truss rod bracket bolts.


On the corners of the car roof  there are compound curves, both toward the end of the car as well as to the side.  Therefore flexible material must be used to cover these areas.  Flexible plywood was cut into strips and fastened to the framing.  Two layers were applied with the strips offset by half the width so the seams didn't align.  Here Don is stapling the strips down.


After fastening the strips down, filler was applied to fill the seams.  It will then be sanded after it is dry.


Trim pieces that Craig had made were installed as shown here.


Finally, the roof decking is done.  It really changes the appearance and feel of the car when one walks into it.


Saturday, July 11, 2015

A Little Adjustment - May 2015

Much of the time in May was spent in squaring the northeast side of the car where the outer sill was removed and replaced.  Apparently some warping occurred such that the car was slightly narrower at this end compared to what it should be.

The spacer blocks were removed in this section and pressure applied with a hydraulic jack to realign the sill.


John is checking the position of the sill in relation to the end of the bolster and they are now in alignment.


New blocks were made that are slight longer to hold the sill in position.


Some of the tie rods had to be lengthened which means the tent flap had to be raised and the rods removed.  This can get "interesting" when the wind comes  up.


Extension pieces were cut and threaded and will be added to the end of the rods.  Fortunately we still had the mechanical (electric) thread cutter on site.


This photo shows two tie rods, the one on the left in the process of being joined to the extension and the one on the right coupled with a coupler and lock nuts.


Then of course we have to fasten down the tent flap with the straps and ratchets.  We try to put the biggest guy (Craig) in the tightest spaces.


On this day Regis from the Streetcar Museum brought a group through our area as part of the Museum tour.  We usually are part of their tours, especially on workdays.


Meanwhile, work continued on the steel as well.  Here Ron and I are drilling bolt holes through the pivot plates at the west end of the car.


This photo shows the under side of the pivot plate with the large pivot hole and smaller bolt holes.


Work also continued on the roof decking which is nearing completion.


Thanks again to Tom for help with the photos.


Saturday, June 20, 2015

April 2015

Good progress was made in April on the roof decking as well as on the truss rod fittings and re-aligning the north outer sill.

Ron and Bill K. are working on one of the truss rod brackets.  Because of no access above to drill downward they must defy gravity and drill upward through the sill for the bolts to hold the bracket in place.
This is another corner of the car showing the steel bolted in place.  Just below the sill is a spacer (to compensate for steel added for reinforcement), the bolster, and the truss rod bracket.


Two more Friends defying gravity on a somewhat "higher" level.  John and Tom are actually under the car drilling the hole for the center pin for the truck with the magnetic drill.  Note the high tech augmentation of the magnet.


Meanwhile, Bill L. is having his own fun with gravity stripping the paint from the ceiling over one of the end platforms.


In this photo Tom caught Bob and me removing the support for the platforms along the side of the care so we could access the tie rods.  These were lengthened slightly in the process of straightening the outer sill on the north side.


Here Bill K. is modifying some of the hardware for the truss rod brackets.


In this photo early in April Don and Jim are finishing the decking on the lower roof on the south side of the car.


Later, work was begun on the decking on the clerestory  as well.  The appearance of the car is changing quickly now.


The fascia for the clerestory was a bit tricky.  This is a view of the end of a piece in place showing the milling that had to be done.  The upper outer corner is rounded, while the lower inner corner is cut out to accommodate the clerestory window frames.


The last project this month was the re-aligning of the outer sill that was replaced.  For whatever reason it was bent inward slightly so that the car was narrower in this area than it should be.  This meant removing the outer framing pieces, loosening the tie rods, and jacking the sill outward.


In this photo Tom is removing the old framing pieces which involved removing the metal bracket holding it against the outer sill.  The inner end is morticed into the intermediate sill.


This photo shows several of the new framing members, slightly longer than the old, in place.  John appears to be securing one to the sill.

Saturday, May 23, 2015

March Madness - March 2014

I will cover what we did in March in this post and subsequently do April and May, which hopefully will get us current.  March was a busy month as we had 4 work sessions to move things along more quickly.  Extra sessions were added the Wednesday after a regularly scheduled session and participation was quite good.  Work continued on the bolsters as well as starting to install the roof decking and reworking the new outer sill that was out of position.

The first work session was a scheduled open house in conjunction with the Streetcar Museum.  We were greeted with about a foot of snow, so paths had to be cleared for guests to access the areas.


Everyone chipped in with whatever implements were available to move the snow out of the way.  I believe it is Bob with the shovel on the left and Don with the wheelbarrow.


Displays were set up in the car and here John is showing a guest what it will look like when done.  Behind John are some drawings of the car.


The most obvious change in appearance in March was the beginning of the installation of the roof decking.  The boards were oiled prior to installation at Jim's shop.  He is on the left in this photo and was a professional cabinet maker so is a valuable addition to our group. Ron and John also helped with the oiling.


 After oiling the boards were moved out into the sun to dry.  If the shop looks like an airplane hanger, it is.  It is located at a small airport nearby.


Old nail and screw holes in the carlines were filled before nailing the new boards on.  Here Lenny is hard at work.


This photo  shows the holes filled and sanded, ready for new nails.  The fascia and one row of boards have been installed in this view as well.


The chop saw was set up in the car to cut the roof boards to length.  Bob is doing the honors at this time.


The boards are then handed up to the crew on the scaffold to be nailed in place.  Jim's nail gun provides consistency in nailing as well as minimizing damage to the boards.


Here is the view from below.  Visible progress, eh?


More platform boards were cut to complete the platforms around the car to support workers and the scaffolding to work on the roof.  Bob and Ron are teaming up here.


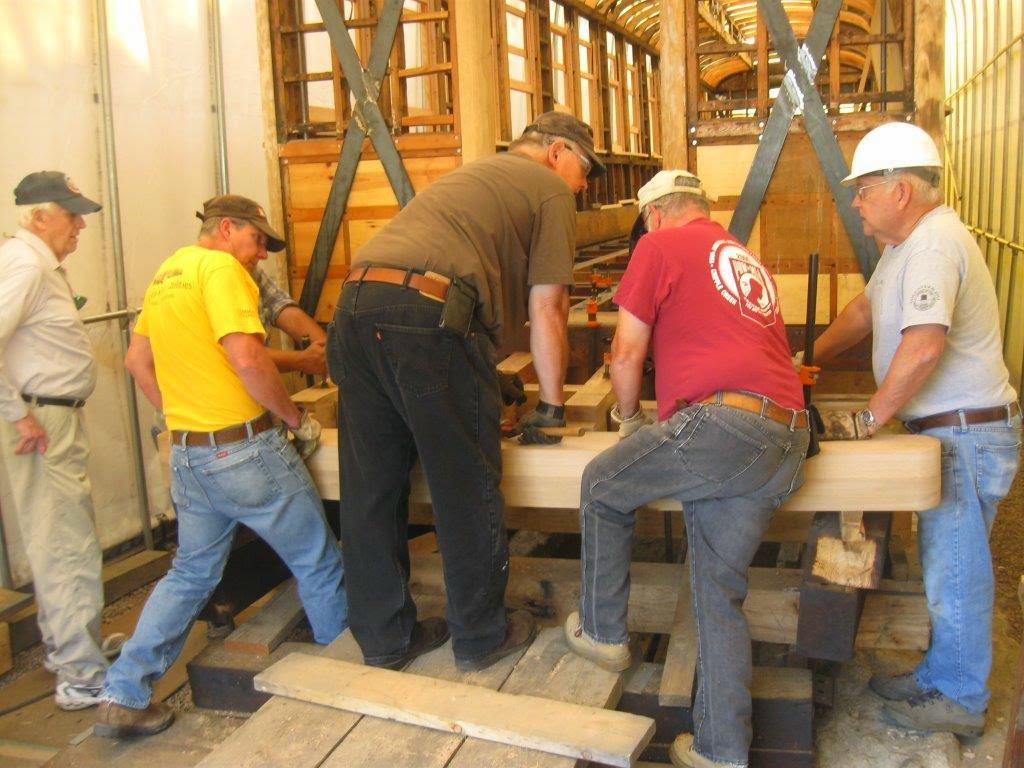
On the May 11 posting there was a photo of the new outer sill showing a misalignment of the sill relative to the bolster, with the sill inboard from the tip of the bolster.  So the sill needs to be shifted outward, which John and Bill K. are attempting to do here with a hydraulic jack.  Also, it means that the framing braces must be redone as well in that segment of the sill.


It also means that some of the tie rods must be lengthened to fit the new (original) width of the car.  In this photo Ron is threading rods for replacement.


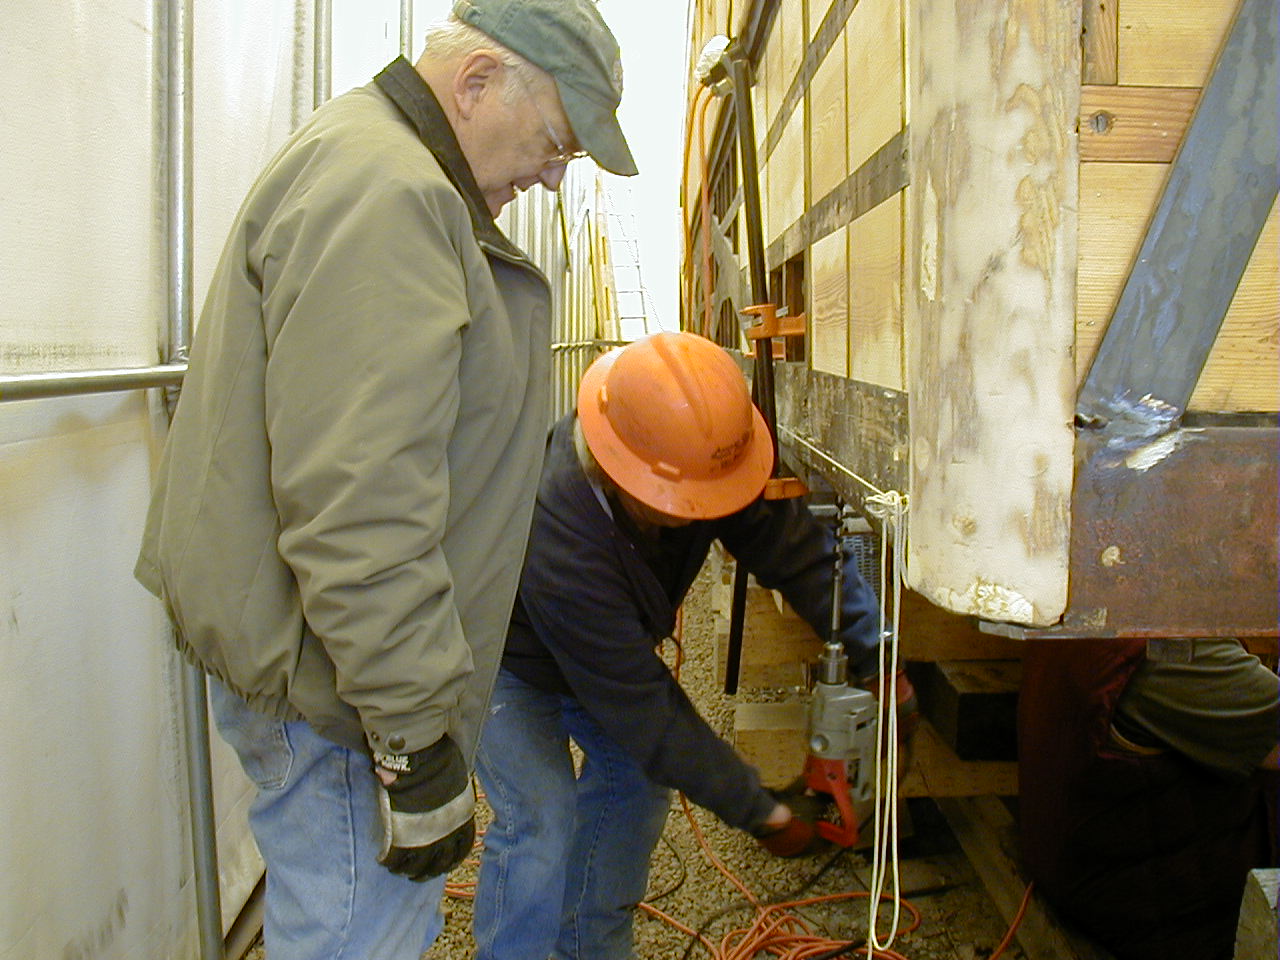
Also in March, drilling continued for installing the bolsters.  They will be bolted to the outer sills, and holes in the wood need to be aligned with the holes in the steel.  The best way to do that is to drill using the holes in the steel as a guide, but that involves defying gravity.  So our team got creative with the magnetic drill, not relying completely on the magnet.


This photo shows the business end of the drill passing through the steel bolster and into the wood.


Again, many thanks to Tom Simco and Glen Hall for sharing their photos.


Thursday, May 14, 2015

2014 Project report by John Engs

With John's permission I am posting his project report on 0252/470 that he did for 2014.  It summarizes work through August 2014, and contains some detail that I have not included previously.


Click here to view the report.


August 16, 2014

Followers

Blog Archive