Friends COS calendar

A subset of the Friends of the Cumbres and Toltec Scenic Railroad located in Colorado Springs, Colorado, with the mission of preservation, restoration, and interpretation of CTSRR historic assets. The Springs group is primarily involved in restoration. See below for blog archive of older postings.

Thursday, June 27, 2024

April 2024

 The old east end sill of the car was moved into the roundhouse for use as a pattern for fitting the tenons in the floor sills and wall framing in the new sill.  Bolster bolts were installed in the new north outer sill.  Cross braces were fabricated and installed between the north outer and intermediate sills.  Two extra work sessions were held in April because of weather cancellations earlier.


The new and old east end sills.  The mortices will be cut into the new sill in corresponding locations to where they are located in the old sill.

Dean is giving Craig a break on the router.  John is holding the light.

Dean is trimming the edges of a mortice.

Dean, Craig and John at work.


The east end of the car was cleaned up, removing old nails, etc.  I believe this is Mike working here.

This side looks good.

Ready for the new end sill (new south outer sill on left).

Similar view of the new north outer sill.

This photo shows two horizontal bolster bolts in place in the new outer sill.  Cross bracing blocks are resting on the intermediate sill and bolster above.

Drilling for the vertical bolster bolts was more challenging (gravity, you know).  Dean is using a right angle drill which helps some.

Most of the work on the cross braces was done from outside the car.

Easier than bending over from inside but still awkward.

New door posts have been installed.  New cross braces are at the bottom of the  photo.


The new east end sill is getting closer to being fitted into place.

The big square nuts for tie rods have been countersunk.

Vertical tie rods were fitted for welding together in the north wall.


Saturday, May 25, 2024

March 2024

 During this month the new north outer sill was fitted to the uprights.  Many of the cross braces between it and the intermediate sill were replaced.

This photo shows the new sill in place with the uprights overriding.  This side of the car will have to be jacked up to fit the tenons on the uprights into the mortices in the sill.

The uprights on the far (west) end have been fitted to the mortices in the sill.  There appears to be an alinement "issue" on the east end.

If you cannot use a bigger hammer, use a come-along.

A little tweak in this direction and it looks very close to where it needs to be.  Dean is applying pressure in this photo.

It looks like the tenons are in a good position now.
They all fit!

Three of the sills were split and had to be repaired.  This is the east end of the south intermediate sill that has been glued with epoxy.

This is the north intermediate sill at the east end just behind the bolster that has been repaired.  There are plates top and bottom with bolts plus the glue.

The last sill repair was on the north intermediate at the west end.  The underside was deteriorated so a graft was glued to the bottom with a plate on top, all bolted together.

With the wall uprights and the sill assembled the cross blocks between the outer and intermediate sills were installed.  Many of the original ones had to be replaced.  In this photo they are hung in place with pieces of wood until they can be screwed in permanently.

          
 New door posts that Craig made were installed on the north side.

The next new framing part to be installed will be the east end sill.  The old sill and other wood have been removed.

This is a view of the east end where the new sill will go.  There will be a lot of fitting to do with mortice and tenon joints on two sides.

The new outer sill was bolted to the bolster.  Here a Forstner bit is being use to countersink the bolt.

Then a through hole is drilled for the bolt.


Saturday, April 27, 2024

January-February 2024

There were only two work sessions in these two months because of weather.  Levelling and fitting the new north sill to the wall framing were the main activities.

This photo is a view looking toward the west end of the car with the new north sill on the right.  The jacks are holding the wall uprights over the mortises in the sill.  (Click on image to enlarge.)

The new sill had to be levelled with the inner sills.  Don and John are checking it out.

The roof jacks were adjusted as needed to fit the tenons into the mortises in the sill.  Dean is standing by in this photo.

Some coaxing was needed to line everything up.

...from different directions.  Glenn is raising the roof in this photo.

The west end looks good.

The east end also.  Notice the overlap splice in the sill.  It has been glued with epoxy glue as well as bolted and secured with steel plates.

Thanks to Don and Glenn for the photos.


Saturday, March 9, 2024

November-December 2023

 The end of the year saw completion of the installation of the new outer sill on the south side of the car and transition to working on replacing the north outer sill.  The roof jacks were removed from the south side and installed on the north side of the car.  Splits in both intermediate sills were repaired.

Tie rods were cut to free up the old sill.

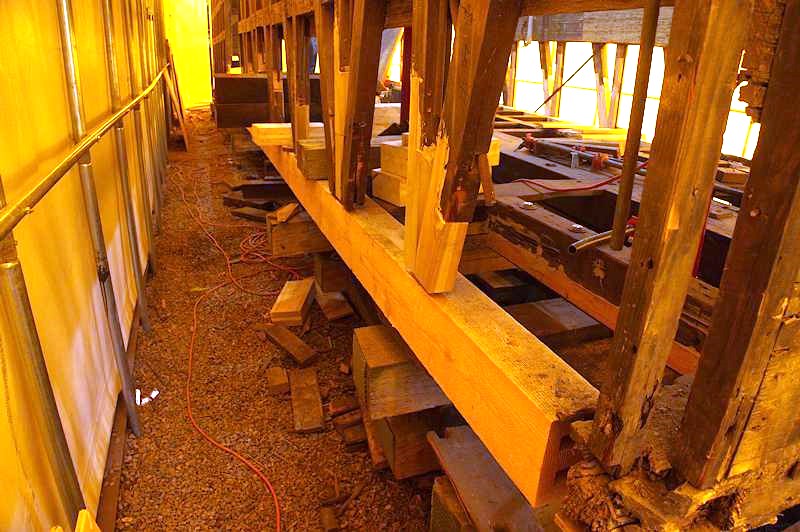
A view of the west end of the north sill.  The roof jacks have been moved to the north side of the car.  A couple of the wall framing members that were deteriorated have been cut off although there will be less need for replacement on the north side compared to the south.

A closeup of the north end of the west bolster showing deterioration of the outer sill around the end of the bolster.

A view of the north end of the east bolster showing considerable deterioration of the outer sill in this area also.  The roof has been jacked up slightly with the wall framing elevated about an inch off the sill.

Out comes the old outer sill.

Work continued in the meantime on the new north outer sill in the roundhouse.  Craig and crew were routing mortises for the wall framing.  The old sill was used as a pattern.

Repairs were begun on the split in the east end of the south intermediate sill.  The area was cleaned up with air prior to gluing.

Larry is applying epoxy glue to the split.

It is glued and clamped.

This is one of the angled tie rod anchors that has been mortised into the new sill.  Nice job!

Joe has made new grab bars.

A view of the northwest corner of the car after removal of the outer sill.

This is a closer view (with Larry gingerly entering the car) showing a door post for the side door on the floor next to the jacks that Craig has made.  The door posts have a tenon on each end and will be installed in the new sill when the jacks are removed.

The northeast corner at the same time as above.

This is a view of the under side of the west end of the north intermediate sill showing deterioration.

Meanwhile in the roundhouse work is continuing on the new north outer sill using the old sill as a pattern for the mortises.

Craig has made a guide for the router...

...which cuts the new mortise.  Dean follows with a hand chisel to clean it up.

A photo of the west end of the north intermediate sill (left center of the image) showing a split near the middle.

Glenn is placing a jack under the northwest corner to take load off the intermediate sill prior to repairs.

Ready to work on it.

Repairs are underway,  The deteriorated underside has been replaced with new wood.

In the roundhouse the new sill is being drilled for tie rods.  A drill guide is fastened  in place to keep the holes plumb.

Works better than an eyeball!

The new sill going into place.

Old bolts were removed from the bolster.

This is the third split in an intermediate sill, located in the north intermediate sill extending from the east bolster toward the center of the car.  The bolster can be seen at the extreme left of the photo.

One section (east) of the new north sill has been put into place.

A close up view of the east end  shows the sill resting on the bolster.  Clamps are fixing the intermediate sill split in place and a steel plate to support the repair is in the lower right of the photo.

Another view of the repair.  The split is supported by a scissors jack and the steel plate is behind.

Here a steel plate is being installed in the repaired split in the west end of the north intermediate sill. Holes were first drilled in the plate then into the sill.

This is the same area after drilling before placing the bolts through the plate and wood.

HAPPY NEW YEAR ALL!


Followers

Blog Archive