Friends COS calendar

A subset of the Friends of the Cumbres and Toltec Scenic Railroad located in Colorado Springs, Colorado, with the mission of preservation, restoration, and interpretation of CTSRR historic assets. The Springs group is primarily involved in restoration. See below for blog archive of older postings.

Monday, August 26, 2013

Sills and steel II - 8-17-2013

The first photo shows preliminary placing of the flat steel bracing with the lower cross piece in place.  A second will be added in the upper left part of the panel, and all will be welded together to form an "X", and to the upper plate and lower angle piece.  This will be done to all four end panels.


In this photo Craig has made the spacing blocks for the sills and they have been assembled as shown.  There are mortises between the blocks and the sills to add stability.


Next we began reinforcing the needle beams with steel.  Earlier, Craig had spliced wood into the ends replacing portions that were rotted.  The steel is a squared U-shape that will be recessed into the beam.  Cuts were made longitudinally in the beams and the center routed out so that the steel will be flush with the wood.

We had to chisel out channels for the steel as shown in the photo at right.  It was a very tedious process and Craig and I worked on it for quite a while.  Greg ("shop foreman" at the Trolley Museum) contributed a mortise chisel as well as some labor.


This photo shows the steel in place in the beam on the left.  Craig took the other one home and shaped it for the steel in much less time on his table saw.


This gives me an opportunity to thank the folks at the Trolley Museum for all that they do for us in letting us occupy space, providing help or equipment when needed, etc.  We got to return a favor on Monday the 19th of August when they received this PCC from Pittsburgh, and Craig and Lenny helped unload it.  The interior is in as good a shape as the exterior, and hopefully one day it will travel the streets of Colorado Springs.  Thanks to Ron O. for the photo.  The TM will be receiving some equipment from Denver soon, and some of us hope to give them a hand with that as well.

Sunday, August 25, 2013

Sills and steel - 8-3-2013

This photo was taken at an earlier work session, and shows Bob and me drilling the plate for bolts to fix it in place on the end of the car.  We took turns drilling and squirting Greg's "special juice" on the drill for lubrication and cooling.


Here the plate has been installed and bolted in place.


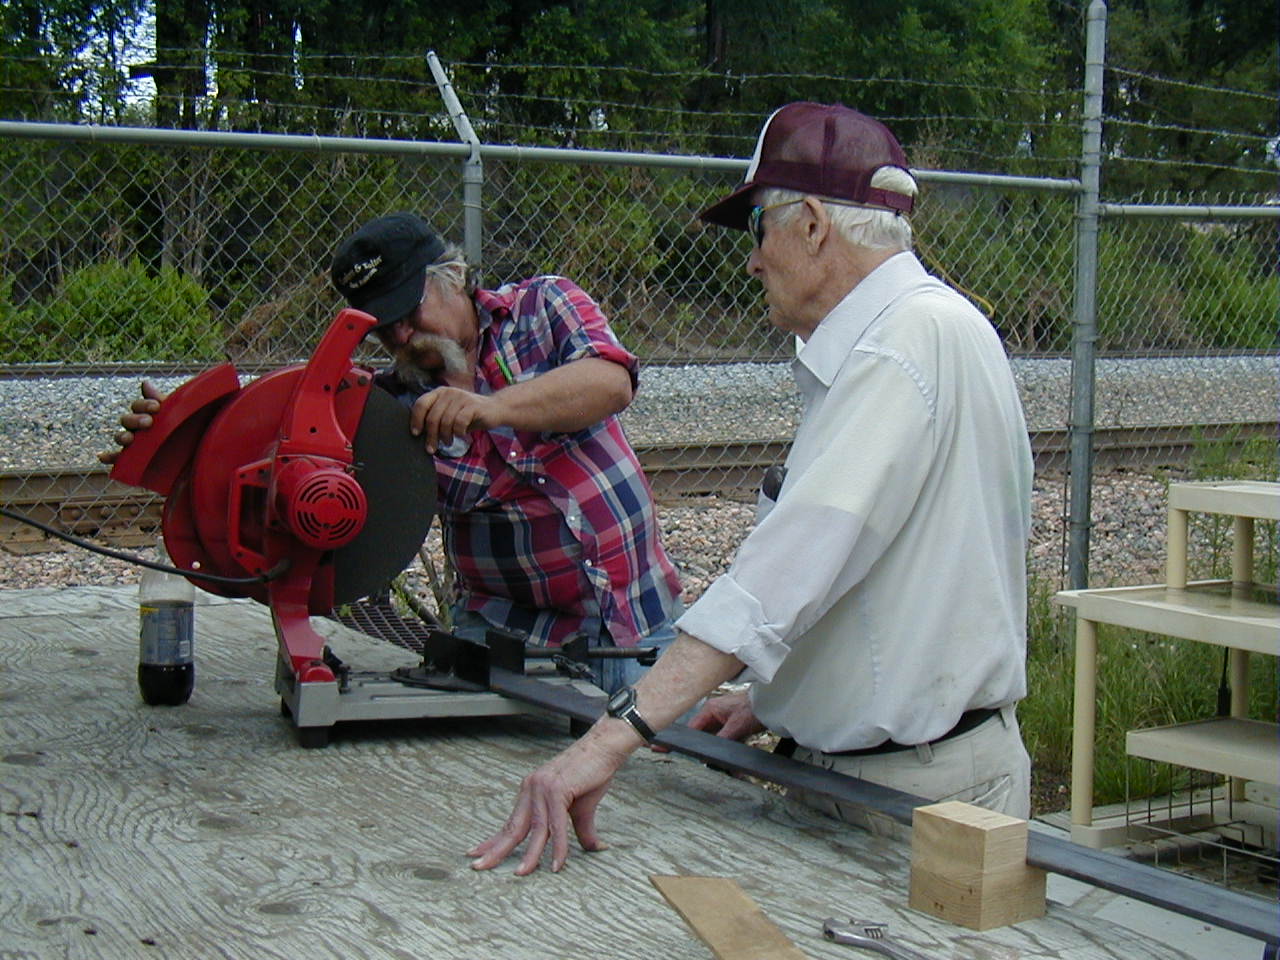
The upper plate will be welded to flat pieces of steel which in turn will be welded to the large angle steel that goes across the end sill under Lenny's feet.  There will be shorter pieces welded to the longer one to make an X that will be over the framing and under the siding of each wall next to the doors.  On the right Lenny is cutting a piece of steel while Glenn supervises.

Bob has removed the moulding from near the middle of  the end panel above on the left and is chiseling out a channel for the steel to pass through.  This piece of wood protrudes slightly from the plane of the remainder of the framing.


The remainder of the time was devoted to fitting of the platform end sills.  Craig inspected the sister car at the Colorado Railroad Museum and took some photos which showed that the sills are very slightly spread out on the outer ends in relation to the inner ends under the car.  Eventually there will be spacer blocks and an end piece to hold them together.  They are temporarily held in place with pipe clamps that can be seen through the door.


This photo shows the inner end of a sill which has been tapered to accommodate the truck assembly.


Next we drilled the holes for the retaining bolts for the end sills through the angle steel that was placed around the inner sills, using the existing holes in the inner sills as guides.  The drill also marked the new end sills for later completion of the holes through them.  Tom is guiding the drill, while Bob and I are applying pressure using Tom's patented ad hoc drill press.


Finally, the sills were removed and the bolt holes completed all the way through.  Glen is keeping the drill vertical while Tom is doing his thing.

Wednesday, August 21, 2013

End Plates - 6-26-2013

In a previous post we showed the making of
a pattern of the wood end panel over the door of 
the car.  One of the originals was fairly well 
preserved.  

The first photo shows the pattern 
as well as the two steel plates that were 
made from the pattern.  These will be fastened 
over the doors and become part of the steel 
reinforcement at each end of the car.


The second photo shows Bob and Lenny
clamping the plate in place.  It was installed
with minimal forcing although I did wear
my earplugs.


Another view of the plate in place.  Tom is
applying a clamp in the center.


A little re-shaping had to be done to fit the
wood trim.  The two ends were very similar
but not identical.

Wednesday, August 14, 2013

Wood work - 4-20 & 5-4-2013

Prior to the work session on 4-20, Craig 
fabricated replacement sill extensions for 
the end platforms using the ones we had
removed as patterns. The first photo shows 
his shop where he has glued the pieces for 
lamination together.
The second photo shows the finished extensions at the work site ready for installation.


Work continued on fitting the brackets for the cross braces.  Dale is doing some trimming on one of the braces.
Craig continues to fill and sand the corner posts as shown in the next photo.  Some are being reused, while others needed replacement.
One of the fascia pieces is being installed in this photo.  Some of the new window framing is also visible.

Thanks to Craig and Glenn for taking these photos in my absence.

Tuesday, August 13, 2013

Replacing I-beam, 3-30-2013

 It was discovered that the floor was uneven at the east end of the car due to the I-beam supporting that area not being straight.  The beam was replaced by jacking up the car as shown in the the first picture.  The beam to be removed is behind the jack.
A chain was secured to the beam, and a cable puller (anchored to Lenny's truck) was fastened to the chain.  The beam was then slid out from under the car on to saw horses as shown in the next photo.


Fortunately we had a good crew this day.  I believe it can be seen that the right end of the beam is sagging a bit from a prior repair.


The last photo shows the new straight beam in place.  It is a bit short to support the outer sills, so a piece of angle steel was inserted on it as shown.  The sills appear much straighter now.

Thursday, August 1, 2013

Installing cross-brace brackets - 3/28-4/6/2013

With the angle steel pieces in place along the inner sills, the cross braces abutting the steel must be stabilized.  Brackets have been fabricated (see Feb 2nd posting) to accomplish this.

In the first photo a bracket has been set in place on the cross brace on the left.


The second photo shows a view from below.  You may recall that originally the braces were mortised into the sill, but the tenons had to be cut to place the steel.


The third photo shows the cutout for the truss rod that is adjacent to the brace.  The finish had to be removed from the angle piece prior to welding.


The welding was done from below as shown in these two photos.   Precautions were observed with water hoses and fire extinguishers immediately available.  No untoward events occurred.
The end result is shown in these two photos.  Following welding, bolts were placed through the brackets fixing the end of the brace securely in place.

Thanks to Tom and Glenn for taking photos in my absence.

Followers

Blog Archive