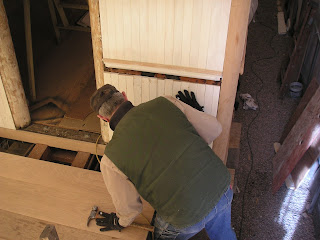
Work continued on the under side sheathing. Here Bill K. and Don are cutting one of the edge boards to fit around the hardware that is protruding through the outer sill, while John is looking on approvingly.
In this photo they are fitting one of the edge boards.
The eyes for the truck check chains were installed as mentioned previously. This is an original one that was still on the car. Erosions are readily seen consistent with its age.
Several of the eyes were missing and it was necessary to fabricate replacements. This is a new one made by Joe S. the welder.
A side view shows the location of the tie rods under the steps.
This photo shows one of the step assemblies temporarily in place on the side of the west end platform. It will be fastened by an L-shaped plate to the steel on the end sill of the car on the right side, and by bolts into the platform end sill on the left.
Here John is holding one of the original L plates against the side of one of the steps where it will be bolted on. The upper surface will be welded on to the steel of the car end sill.
This abstract image is of the underside of the car end sill in the center of the image, and the side of one of the steps in the lower left corner. The L plate will bolt to the side of the step and be welded to the sill above. We do not have all of the L plates and Joe will be fabricating replacements.
As you might imagine it is a big first step to reach the lower step on the car from the ground, so the solution back in the day was to carry a step stool on the train that was put on the ground for passengers to get on and off the train safely. Craig assembled this in his "spare" time recently.
This photo shows the face piece of one of the platforms that has been notched to fit over the platform sills. A corner of one of the deck boards can be seen at the right edge of the picture.
This photo shows the platform decking installed temporarily between the end sill and the face piece. There is a good tight fit between the boards which will help hold the face piece in place.
 In addition lag bolts will be installed at each end through the face board and into the end sill. It is necessary to drill through the steel on the sill, and here Joe is using the magnetic drill to accomplish this.
The siding for the end of the car was formed into panels before installing. Grooves had to be routed into the back to allow for the steel bracing.
Here Craig is making adjustments with the router for a perfect fit.
In it goes for one more check.
The moulding around the windows is installed.
Here is some more detail on the prototype seat. There is a post from the seat back to the clerestory that will support a panel between the seats to give some privacy when sleeping.
This photo shows more detail of the arch that connects the post to the clerestory. The circle at the base of the arch will hold a rod for a curtain to close off each "compartment."
This is a photo of a photo of the interior of a sister car as it left the factory. It shows the posts and arches and also has the curtain rods in place.
Approximately in the center of the post is this block that the upper berth platform will rest on. The actual block used in the car will be a casting made from this model.
We had a visit from two gentlemen from the Railroad this month, John Bush, President, and Efstathios Pappas, Assistant General Manager. In this photo they are getting a tour from John Engs, COS site leader. From left to right they are John Engs, Mr. Pappas, and Mr. Bush.
In this photo Craig is demonstrating the workings of a clerestory window to John Bush.
Here it is, finished and painted. There also is a cross piece welded to the tongue of the trailer to hold a tool box.
Craig built this box to fit on the trailer. A coat of paint and it will be ready to go.
We had a severe windstorm in January that was severe enough to overturn two semis on the Interstate near the Air Force Academy. It also separated the zipper tape from the fabric on our shelter on the east end. The tape can be seen hanging free between the edges of the fabric in this photo.


It was separated all of the way to the top of the zipper. I used a hand stitcher for leather or sail repair to sew the tape back on to the fabric. The first stitches are shown on the right.
The photo below shows the completed repair. The entire length of the zipper on the right needed fixing as well as the lower 2-3 feet of the one on the left.
Thanks to Tom S. and John E. for contributing photos for this months posting.


No comments:
Post a Comment