This photo shows the grooves in which the pins on the seats and backs must slide.
Here Dean and John C. are drilling holes in the seat castings for the screws that will hold them in place in the car.
Hinges were installed on the seat back and bottom.
Seat frames and cross pieces were screwed together, here by John C. with Bill L. and Don helping.
Each seat was checked out to insure the back and bottom slid freely in the frame. Dean is working on two of the single seats. These are positioned against the walls at the ends of the car.
Bill L. is placing a screw in the top crosspiece of this seat. The outboard frame is screwed to the wall and the feet of the frame on the aisle are screwed to the floor.
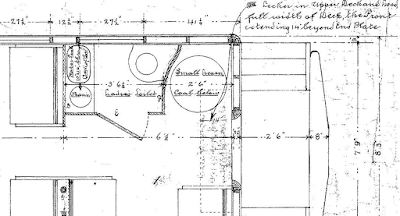
This is a section of the drawing of the 470-type cars showing the south side of the west end of our car as it is currently situated. In the corner the round item is a coal fired heater. To the left next to the curved wall is the ladies' toilet, with a water tank and wash basin on the left wall. (Click on the image to magnify.)
This part of the drawing shows the northeast corner of the car with the "Gents' Saloon" in the corner. It is larger than the ladies'facility but unheated. There is a straight wall adjacent to the toilet and on the other side of the wall to the right is a water tank and wash basin. The oval structure to the far right in this space is labelled "Cooler." There is another wall between the cooler and the seat.
The walls are constructed out of red oak finished and beaded on both sides.
These pieces were milled to take the oak boards and are fastened to the walls and floor. The curved piece is fastened to the convex side of the curved wall to maintain the shape and provide stability.
Craig made a mockup of the curved wall. One of the grooved pieces as above was bent to hold the lower ends of the boards. The stabilizing piece is clamped on.
Here is the mockup in place where the wall will be.
The grooved moulding is fixed to the wall at an angle to start the curve.
This photo shows the beginning of the construction of the curved wall. Lots of fitting to be done!
This photo shows the finished curved wall. The heater goes on the right of it and the ladies toilet on the left. The open door at the end of the car is at the extreme right.
There is a curved brace on the convex side of the wall.
The wall between the ladies wash basin and the first seat was straight and therefore simpler. This is a photo looking toward the west end of the car.
The walls between the seats were begun. Grooved moulding was fastened to the outer wall and the first board fitted into it with cutouts where necessary.
Each board was cut to length and the upper end rounded to fit the curve of the ceiling.
The first two partly done.
There will be sliding doors between the seats so there is an opening in the walls as shown here. The support post for the upper boards is temporary.
By the end of the month work was progressing well on the walls. In this photo John Engs is showing the car to some visitors from the Friends meeting. We get visitors from the Trolley Museum also since their docents include 470 on their tours of the streetcars.
With the walls in place we are able to finish the ceiling. Insulation was not sprayed where the walls were to go, so these areas needed insulation.
Fiberglass was used as shown here.
Moulding was fixed to the upper walls against which to place the ceiling boards. Don is nailing this piece in place.
The ceiling boards are cut to length and nailed in place. John C. is holding and Don nailing.
This photo shows a completed section.
Tom Simco, a retired sheet metal guy, has been installing the copper flashing on the clerestory windows.
First the corner pieces that Ron made are installed.
This is a sheet metal brake for bending and shaping sheet metal, brought up from Antonito.
The copper was shaped to fit the windows using the brake.

The copper work was a time consuming process but moving right along and looking good.

A few other tasks were completed this month. In this photo Mike is cutting off the protruding threads from the platform railing posts on the east end of the car.
This looks much better.
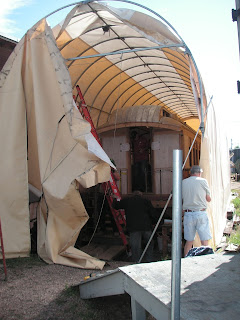
Finally, the protective structure for the car sustained wind damage with the seams fastening the zippers to the fabric tearing out. This photo shows the removal of the west end which was sent for repairs.
Now the main part of the fabric has to be brought out over the end arch and tacked down.
Thanks again to Tom and Don for help with the photos.


No comments:
Post a Comment