Friends COS calendar

A subset of the Friends of the Cumbres and Toltec Scenic Railroad located in Colorado Springs, Colorado, with the mission of preservation, restoration, and interpretation of CTSRR historic assets. The Springs group is primarily involved in restoration. See below for blog archive of older postings.

Thursday, January 5, 2017

October-November 2016 Making hay

We had a warm and dry fall which was good for accomplishing a few things.

We were able to get the siding and underside sheathing boards primed during the good weather.  Here Ron and I are busy at it.


 Debbie filled nail holes in the window trim.


 Craig started to repair the split in the outer sill.  First he had to smooth out the surface and started with the oscillating tool.
Maybe it is easier from below?
 Then there is the good old hand chisel.
 Anyway, it is looking good.
 He cut a piece of wood to fit.

Then clamped it in place and drilled through it and the sill for bolts to secure it.


Lastly, the repair is bolted and glued in place.


Meanwhile, Bill L. has been sanding the overhangs on the ends of the car.


John and Joe, the welder, are discussing the fabrication of the body truss rods.  There are two of these located under the outer sills that help support the center of the car.


The rod will be welded to this anchor assembly which is attached just above Joe's arm to the body bolster.


Here is a drawing of one end of a body truss rod similar to that being used in car 470.  It is anchored to the bolster on the left, with a queen post at the bend toward the center of the car.  A portion of the turnbuckle is visible at the edge of the drawing for tensioning the rod.  Click on the picture to enlarge.


This photo shows the turnbuckle that will be welded onto the rod.  A queen post can be seen at the very top of the photo just to the left of the far beam.


And then again the support blocks are in the way.  Don is moving one of the ties into place.


It looks like this will hold.


Craig has also been busy constructing a prototype seat primarily for measurement purposes.  The round stop on the vertical post is for the upper bunk platform to rest on.


This photo shows a prototype seat.  The back and seat parts are hinged together and will be able to slide forward and flatten out to meet the facing seat and make a lower bunk platform.  No bedding was included; it was BYO.


No work sessions were held in December because of weather.  Hopefully we will see a January thaw.  Thanks again to Tom Simco for some of the photos taken in my absence.

Sunday, January 1, 2017

September 2016 - A surprise

We  continued with priming the siding and underbody sheathing boards prior to installation.  Here Bill L. and I are painting behind the trolley museum roundhouse in the shade.  The PCC cars are waiting patiently for the day when they may again run the rails in Colorado Springs.


These are now drying in the sun.  OB's old ring gear is leaning against the wood shop.


We also continued to install the underside sheathing.  There are a myriad of bolts, nuts, and other hardware under the car necessitating a lot of cutting and fitting of the boards.  Here Don is cutting a notch with the saber saw.


Then each board is fitted into place and screwed into the framing.  Don is seating the tongue and groove on the far end with a mallet.  Some of the hardware can be seen protruding from the underside at the near end.


Bill K. is placing the screw with the electric drill.  We are thankful for young shoulders.


This section is done and looking good.


After completing a section it was necessary to move the supports of the car in order to work on that area that was above the supports.  That meant jacking up the car and moving the blocks.


 The surprise was that John noticed that part of the outer sill on the south side of the car was split away exposing the lag bolts for the pad eye for the truck check chain.  The tips of the lags remain in the sill holding the eye in place, but not very securely.


The split extends between the cross pieces which appears to have contained it.


This drawing from the Car Builders Cyclopedia shows a portion of a truck with the check chain attached to the frame.  The hook was placed in the eye attached to the frame of the car to keep the truck from rotating excessively.  Presumably there was a "mishap" in the past where the truck was rotated to  the point where the force on the eye split the sill.


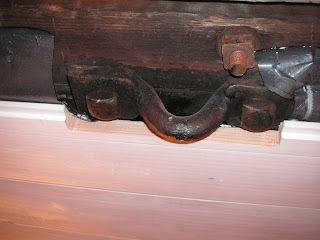
This is a view from beneath the car showing the pad eye and a portion of the sill missing. Tom's T-shirt is visible through the hole.


This photo shows the intact hardware on the other side of the car.


In this photo the framing cross piece has been removed adjacent to the eye in preparation for repairs.  To be continued.

Wednesday, November 9, 2016

August 2016

We continued to install the siding panels on the east end of the car.  In this photo I am holding the panel in place while Craig inserts the screws from the back side.


Here he is on the other side placing screws through the wood blocks into the siding panel.


After installation, the panels were primed on the outside with an oil based primer by Bill L. and Ron.


The west end panels are installed and primed.


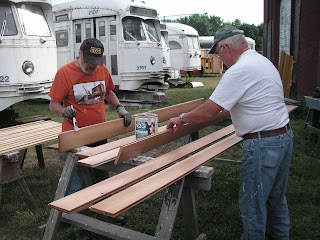
In this photo Bill L. and Ron are priming the cedar boards for the underside sheathing before installation.


Cutting and fitting the sheathing under the car was difficult because of the complex framing.  Here Bill K. is screwing a board in place.


Meanwhile work continued on installing siding.  Here Craig is cutting primed boards to fit.


These boards are going between the windows, and Craig is nailing one in place with the nail gun.


This side is looking finished.


We had some uninvited guests this summer in the form of wasps.  There were nests on and in the trailer as well as in the pipe for the hand rails to the steps into the trailer.  John, with deadly accuracy, took care of them, however.  Fortunately no one got stung.


We had to jack up the car and move the support blocks and beams to access parts of the underside for the moisture barrier and sheathing installation.  This heavy duty jack was borrowed from the Trolley Museum and made lifting the car look easy.  John is doing the heavy lifting here.


This steel beam can be moved now.


In this last photo Bill K. is placing blocks in a new position under the car.

Wednesday, November 2, 2016

July 2016

Fastening the siding boards to the ends of the car presented a challenge because of the steel bracing that was added.


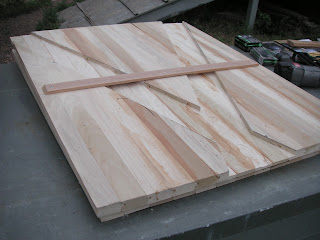
Craig's solution was to make a panel of the siding boards by gluing them together and then routing out grooves for the steel braces as shown in this photo.


The panel fit over the braces as shown here.  Wood strips were nailed and glued onto the framing so that screws could be used to hold the panel in place.


This photo shows a closeup of one of the wood strips with a screw into the siding.


After the fitting Ron applied primer to the inner surface.


Mean while work continued on the under side with cutting and fitting the moisture barrier.  Bob is cutting in this photo.


At the same time cedar boards were installed over the moisture barrier.  Bob is doing the  measuring and cutting.


Bill K. is under the car doing the nailing while Bob is measuring for the next piece.

Followers

Blog Archive